
Note: I am not affiliated with any of the companies/brands mentioned here. Last updated 10/21/21
Here is a more detailed explanation of my acrylic painting process - from the supplies I use to my painting techniques. This is for those who are just curious to know how I paint or who want to learn to paint in acrylics themselves. If you are reading this to learn to paint, please note that this is not THE best or THE only way to paint in acrylics; it's just what I have learned so far and what works for me. I may change this write-up from time to time as I figure out new ways to do things and improve my technique.
MY SUPPLIES:
Paints: I use Liquitex and Golden brand acrylic paints. My main palette consists of ten colors - Mars Black, Titanium White, Ultramarine Blue (Green Shade), Hooker's Green Hue Permanent, Deep Magenta, Cadmium Red Medium Hue, Cadmium Yellow Light Hue, Raw Sienna, Burnt Sienna, and Burnt Umber - but I also have other colors in case I don't feel like mixing. Notice I use the hues; I don't want to be dealing with toxic paints!
Mediums: I use distilled water to rinse my brushes and thin the paint. If I want to thin the paint down considerably, I use Liquitex Airbrush Medium, Liquitex Glazing Medium, or mix Liquitex Gloss Medium & Varnish with the water to ensure the paint does not become underbound. I'll also use Liquitex SLOW-DRI Blending Medium when needed. I protect my paintings by first applying an isolation coat of either Golden Soft Gel Gloss mixed with water or a permanent brush-on varnish by Liquitex, then I apply a removable spray-on varnish by Grumbacher on top. I prepare my canvases with an extra layer of gesso to help the paint stick to the surface better.
Brushes: I use a variety of brushes from a variety of brands and most of them are generic and inexpensive. As long as the hairs don't constantly fall out, I do just fine with cheap, synthetic brushes. I've enjoyed using small round brushes by Sterling Studio for detail work.
Surfaces: I like canvas better than paper as paper absorbs the paint and makes the paint dry quickly and it breaks down if a lot of water is used. I have used many different canvases from different companies, but I mainly use archival and pre-gessoed stretched canvases and canvas panels by Fredrix. I like stretched canvases for their depth and I like canvas panels for their rigidity.
Palette: I currently use a piece of glass from a picture frame as my palette. When it gets covered in paint I wet it with water and scrape the paint off with a razor scraper. I have used paper palettes in the past, which I prefer because they're so convenient, but they are rather wasteful.
Other supplies: While I do own a few easels, I prefer using my drafting table to support my canvas. I have a large, adjustable desk chair so I can comfortably sit at my drafting table for hours. I view my reference photos on my phone while I'm painting. I like to use facial tissue to dry my brushes off with which...probably isn't the best idea due to the lint they shed, but it's super convenient. For my water well I use anything I can find that holds enough water...nothing fancy. To transfer an outline to my canvas, I mainly use graphite transfer paper.
Another one of my must-have "items" when painting is music. Listening to music while I paint increases my attention span and makes me get more done. Sometimes I even paint to the beat of a song.
 |
| Some of my more frequently used colors But those brushes aren't frequently used... I didn't want dirty brushes in the photo 😀 |
MY PAINTING PROCESS:
I'll explain my painting process using one of my pieces titled "Mini Vista." Although the process is almost always a little bit different for each piece I create, most of the techniques I used for this painting I have used for other paintings.
I almost always work from digital photographs and I start most of my projects on the computer. I design my composition using a photo editing software. Here I can change the placement of the subject, shift the colors, swap out the background, etc. Once I am happy with the composition, I print out the subject to size. In this case I had to print out the chipmunk on two pieces of paper and tape them together. For this painting I also copied the digital mock-up onto my camera. I'll tell you what that's for later.
I place graphite transfer paper on top of the canvas and under my printout then I use a pencil to trace the outline and many of the details of the chipmunk and the surrounding objects. I need to make sure the outline around the eye especially is accurate. Since graphite can be difficult to cover up with paint, I make sure to only draw the outline at the base of the hairs when outlining a furry subject like this one.
|
|


Other methods I use for transferring an image to my canvas include freehand drawing and the grid method, but those take much longer to do and aren't as accurate as tracing.
It is now time to get painting! I like to work from the farthest object in the picture to the closest, so I almost always paint in the background first. At this point, I'm only blocking in the different shades of green just to completely cover the white of the gesso beneath. I thin my paint down a little so I can get more coverage with less paint.
|
|


After the first background layer is dry I add more layers to get the look I want. For me, an unfocused background is usually the most difficult part to paint; it often takes several attempts to get it to look right. I found that dry brushing (using a very small amount of paint on the brush with no water added) in a circular motion is a very effective technique for painting bokeh.
For this piece I was not copying the background that was in the original photo because I thought it wasn't out-of-focus enough and it wouldn't make the subject "pop out" of the painting. I was, however, keeping the colors that were in the original background. To make sure I've mixed the right color, I paint directly on the printout and adjust the mix until it matches or is close enough.
|
|


|
|
|


Then it's detail time! This is where my little camera comes in handy. The camera allows me to zoom into the photo to see every detail I need to paint. I refer both to the printout and to the image on the camera, using the camera for the details and the printout for the colors and general shapes. (Nowadays I use my phone instead of the camera, which displays more accurate colors and allows me to zoom even farther in.)
 |
| The reference photo on my camera |
I use a very small round brush which I have intentionally (sorta, kinda 😜) bent into an "L" shape. While I don't recommend damaging brushes, I have learned to work with damaged brushes and I don't really feel like changing the way I use and hold my brush.
I always like to start with an eye if I am painting an animal. Eyes often contain the darkest values which helps me determine the values of the rest of the painting. An eye also gives me something circular to paint around which I like for some reason.
It is very important to pay attention to and try to copy everything I see in the photograph. I don't want to paint "a chipmunk," I want to paint the colors and patterns that make a chipmunk look like a chipmunk. I believe a good realism artist is able to focus only on the colors, values, and patterns in a reference photo.
With the eye finished, I start on the fur around the eye. I use my thinnest round brush and I thin my paint down with either airbrush medium or water depending on the consistency and opacity I want. Sometimes, for longer, wispier hairs (or feathers) that are not as well-defined, I use the thin side of a flat brush. Once again, I must carefully pay attention to the photograph; it won't turn out well if I paint the hairs in the wrong direction.
 |
| I constantly (and I mean CONSTANTLY) refer to the reference photo |
Most of the time, when painting fur, I am just painting the highlights. The highlights along with the dark color underneath as the shadow creates the look of individual hairs.
In this particular painting I intentionally made the highlights too light so I could later glaze over them in the correct color. The reason I did this has to do with the different opacities of different colors. The reds and yellows I needed for the chipmunk's fur are translucent colors and I would never be able to paint over the dark underpainting with these colors and get good results. So by first painting the highlights in white (or a mixture with white in it), which is an opaque color, then glazing over that with a thin wash of oranges, I can get the fur detail and have it the correct color.
|
|
|


With the chipmunk's head just about finished, I move on to the tree stump, since I need to finish everything under the chipmunk before I can finish the chipmunk.
 |
| I had to finish the stump before adding the last of the chipmunk's fur over top of it |
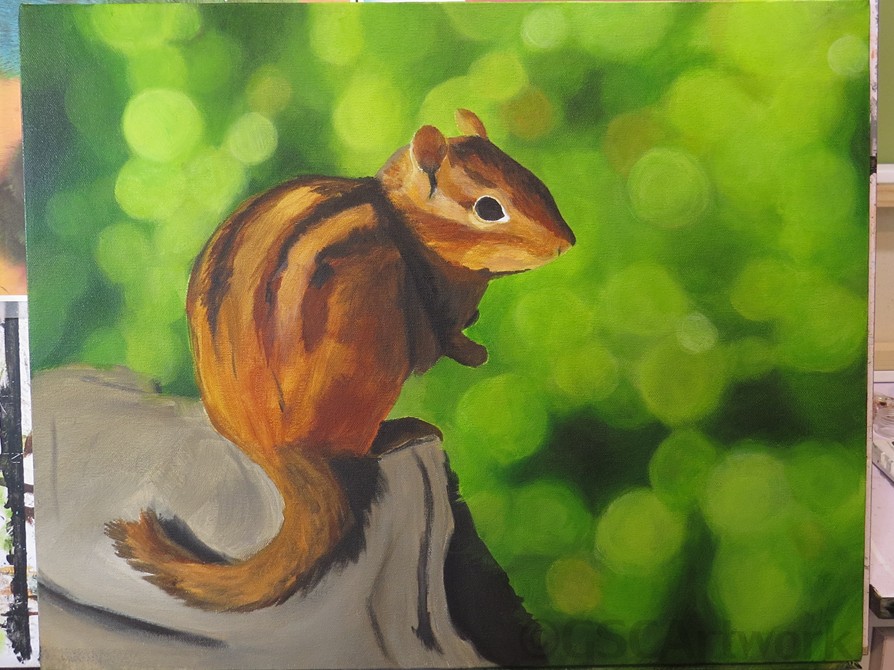
Now I can finish off the chipmunk and finish off the painting!
Many hours later, and after several tries at getting the fur to look the way I wanted it to, my painting is just about finished. I often sign my paintings before I am completely finished just because it makes me feel good to be reminded that I'm at least nearly done. I don't really know when a painting's finished until I have gone away from it for a while and come back. If I come back and it looks good (which is rare), then I call it finished. If I come back and I notice that something is off, I try to fix it. If I can't fix it (or I'm sick of working on that painting and I don't feel like fixing it), then it's on to the next painting. After a while (sometimes a long while) I forget about the "mistakes" on my paintings and I'm able to enjoy them.
 |
| All finished! |
PROTECTING MY PAINTINGS:
In my experience, acrylics aren't as durable as some people say they are, so I varnish my acrylic paintings. For this painting I used two varnishes for extra protection.
I prefer to let my paintings dry for a week or more before varnishing. If I plan on varnishing the painting with a gloss varnish, I try to take a photo of it (preferably outside) or scan it (if the painting is small enough) before the varnish is applied to prevent glare.
Varnishing is always nerve-wracking. Having pets in the house doesn't help either; there is always a hair or two or three that gets embedded in the dried varnish, even if I brush off the surface beforehand. 😣 But I think it's worth the trouble of varnishing to prevent more trouble down the road.
I like to apply a gloss medium isolation coat before spraying on a removable varnish. The purpose of an isolation coat is to protect the paint from the harsh chemicals used to remove the spray varnish. For this painting I used a wide, soft brush to apply a couple layers of Liquitex Gloss Varnish. I now prefer to use a car sponge to apply the isolation coat.
 |
| Applying a permanent gloss varnish to act as an isolation coat |
I let the isolation coat dry for another week or so then finish it off with a couple coats of the removable spray-on varnish (which I have to use outdoors because the fumes are terrible!). It gives me peace of mind knowing that if the painting ever gets stained/discolored (from smoke, dirt, dust, etc.) it can be brought back to its original state by removing and reapplying the varnish. I have found this combination of varnishes to be very durable and water resistant as well. It helps a lot when the flies like to "fix" your paintings. 😬
 |
| DON'T let the flies do the painting for you DO varnish your acrylic paintings |
After the varnish is dry the painting is ready to frame and hang on the wall! Then it's time to start on another painting...or take a long break. I tend to do the latter.
 |
| The final product |